Introduction
I usually work using a laptop computer together with a braille display.
How these two devices are positioned is a very important issue, as it directly affects work efficiency and physical strain.
In this article, I introduce in detail a “Braille display mobile frame” (BDMF) that I designed and built myself, including how it is actually used and the design ideas behind it.
I have been using this mobile frame for nearly ten years now, and I am very satisfied with this handy item.
In 2024, I read the results of the survey
“Braille Display Usage” https://www.livingbraille.eu/results-of-the-survey-braille-display-usage/
was deeply impressed by the scale of this detailed survey and by the careful and thorough analysis of its results.
By the way, in the section “Final proposals for braille display manufacturers” of the survey, there is a statement saying:
For the purpose of ergonomic aspect, the braille cells should be as close to the computer keyboard as possible.
I felt exactly the same desire in my heart.
I was excited to learn that many visually impaired people around the world share this feeling – I am a Japanese adult blind male -.
That is why I believe it is meaningful to introduce the ideas and solutions I developed in order to fulfill this desire.
Captain Neil Armstrong said
that’s one small step for a man, one giant leap for mankind,
but I would like to say
that’s one small reduction in distance for physical world, one giant leap for the blind.
Layout Before Creating the Mobile Frame

Before using the mobile frame, I placed the braille display and the laptop in a line from the near side of the desk toward the front.
Here, I clarify the coordinate system used in this article.
- The direction from the near side of the desk toward the depths (far side)
- is defined as the “positive y-axis”
The user side is the “negative y-axis” - The vertical upward direction is defined as the “positive z-axis”
With this definition, the layout at that time was as follows:
- Negative y-axis: the user
- Positive y-axis: the braille display
- Further in the positive y-axis direction: the laptop computer
This arrangement did not require much desk width, but the distance between the braille cells and the keyboard was large, and both hands had to move significantly along the y-axis.
Why Stacking Was Necessary
Mobile braille displays are equipped with input keys on their top surface.
These keys are useful when used with smartphones and similar devices, but they are rarely used when that is used together with a laptop computer.
On the other hand:
- A laptop already has a full keyboard
- The top surface of the braille display contains unused space
Therefore, I began to think about whether it would be possible to
place the laptop above the braille display
by making effective use of this space.
Details of the Mobile Frame
Structure of the Mobile Frame
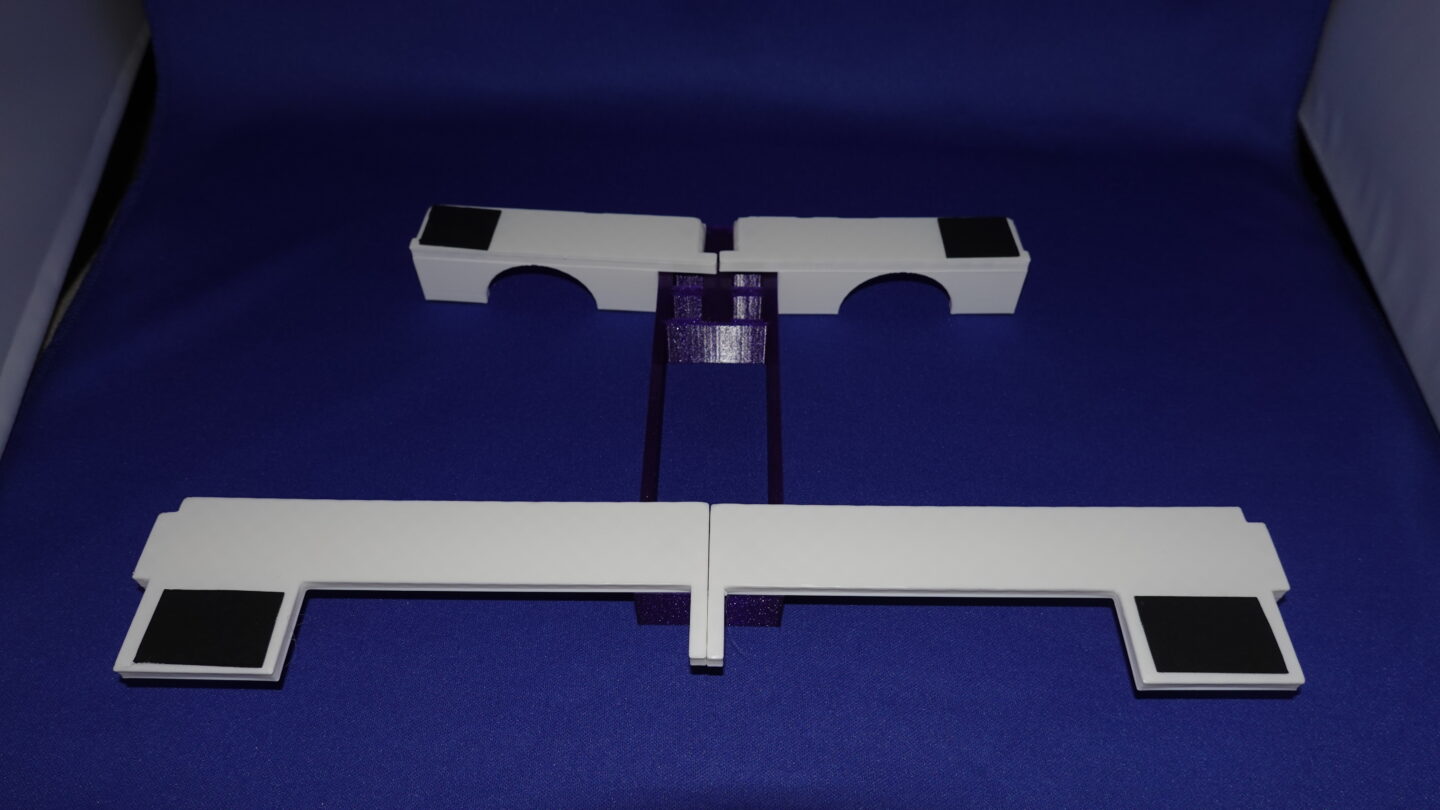
This mobile frame consists of five parts:
- One central part
- Four support parts
When assembled and viewed from above, it takes on
a shape resembling an airplane, with a fuselage extending front-to-back and wings spreading to the left and right.
This shape is the result of designing the frame so that the laptop can be placed stably while reliably avoiding the input keys on the top surface of the braille display.
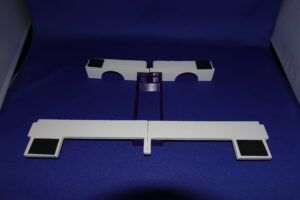
How to Assemble the Frame
1. Placing the Central Part
First, place the central part on the desk with its long side aligned along the y-axis.
2. Placing the Braille Display
Next, place the braille display on the user side of the central part (negative y-axis direction).
Along the y-axis, the devices are arranged in the following order:
User → Braille Display → Central Part
3. Attaching the Support Parts
Attach the four support parts to the central part.
These parts extend to the left and right, corresponding to the gwingsh of the airplane shape.
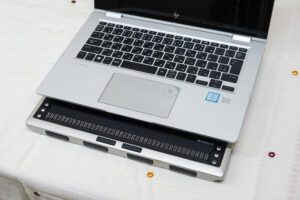
4. Placing the Laptop
Place the laptop on top of the support parts.
The laptop does not touch the braille display directly and is stably supported by the frame.
Summary of the Layout
This structure maintains the y-axis working layout while shortening the distance and lifting the laptop along the z-axis.
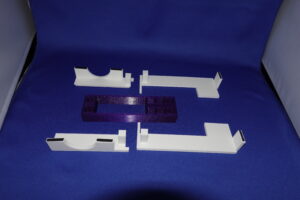
One more characteristic: Portability Considerations

After you use a laptop and a braille display, the mobile frame can be disassembled into five parts.
These parts can be assembled into a rectangular solid by fitting them into the central part, so they do not take up much space in a bag.
Ensuring Versatility
Supported Braille Displays and Input Devices
This mobile frame is not designed for a single specific model.
By measuring dimensions and designing them numerically in 3D CAD, I have confirmed that it can actually be used with multiple commercially available braille displays.
Specifically, it can be used with the following models:
- Freedom Scientific Focus Blue V5 40 / 80
- HumanWare Brailliant BI 40
- Baum SuperVario 40 / VarioConnect 40
The design mainly targets 40-cell-class braille displays.
Differences in width, depth, and top-key layouts are taken into account so that the support parts reliably avoid the key groups.
By adjusting numerical values in the 3D CAD data, additional models can also be supported.
Use with Desktop Keyboards
This mobile frame is not limited to laptops.
Instead of a laptop, you can place:
- A standard desktop keyboard with a numeric keypad
- A compact or slim external keyboard
on top of the support parts, allowing the frame to be used in a desktop computer environment as well.
In this case, the layout relationship remains the same:
- Braille display: in front of the user along the y-axis
- Central part: further in the positive y-axis direction
- Keyboard: above the braille display along the z-axis
Therefore, the same advantages apply:
- Efficient use of desk depth even in desktop environments
- A short distance between the braille cells and the keyboard
Benefits Provided by the Mobile Frame
Effect of Distance Reduction (Numerical Data)
When using the mobile frame,
in a case of VarioConnect 40 and my laptop, the shortest distance between the braille cells and the keyboard is approximately 70mm.
Without the mobile frame, this distance was about 115mm,
so the frame achieves a reduction of approximately 45mm.
This may seem like a small difference, but in work that involves frequent movement between the braille display and the keyboard, this distance reduction is significant.
Measurement of Hand Movement Frequency
I experimentally measured the number of hand movements between the braille display and the keyboard, counted as movements per hour.
The results were as follows:
- Left hand: 244 times per hour
- Right hand: 314 times per hour
In other words, during one hour of work,
there are more than 500 back-and-forth movements in total.
Under such working conditions, even a distance reduction of a few centimeters clearly contributes to reducing arm and wrist movement and fatigue.
Conclusion
What the Mobile Frame Has Brought to Me
At first glance, stacking a braille display and a laptop may seem like a small idea.
However, when viewed in numerical terms:
- Distance reduction: approximately 45mm
- Hand movements: **more than 500 times per hour
it becomes clear that the improvement in the working environment is far from trivial.
Sometimes I wonder how much effort I would have wasted over the past ten years if I had not been able to use this mobile frame.
Effectiveness of DIY Using 3D CAD
Braille displays and computers differ in size and shape depending on the model.
It is unrealistic to accommodate all of them with a single commercial product.
(Far from that, in fact no such mobile frame is commercially available.)
By designing and building it myself using 3D CAD:
- The braille display I use
- The computer I use
- My own working style
can all be reflected simply by changing numerical parameters.
As mentioned earlier, I aimed for versatility, but even braille displays that cannot be covered by this design can be supported by adjusting the values.
This mobile frame embodies the idea that
people with visual impairments can design and fabricate the assistive tools they need themselves.
3D CAD and 3D printers are practical tools that allow us to
replace “enduring an unsuitable environment” with
“creating an environment that fits.”
For braillists, who are a minority, these tools are especially valuable.